Sunday, May 16, 2010

D&D Pin Up Contest


My latest contest entry on ArtOrder, for a pin up of one of the playable races from Dungeons and Dragons. It's a half elven woman on an owlbear-skin rug. In order to make it look like a pin up, I softened almost all the edges, and made the entire composition about displaying the figure's anatomy. I'm really proud of the hands in this piece.


Exorcists vs. Demons


On a side note, I recently have started illustrating for an upcoming installment of a facebook game called Exorcists vs. Demons. I can't show any of the work at the moment, but go play this very fun and addicting game and eventually all will be revealed!

Monday, May 10, 2010

Process, Pt 2

Welcome to the second installment of my ongoing series about process; a step-by-step walkthrough for illustration.

Step Three: From Thumb to Rough

Now we have twenty-five compositions, but only one will survive. The first step in choosing the best thumbnail is easy: many of the thumbs will be boring, awkward, or just won't read. Pay attention to the overall shapes present in the composition, where dark shapes are on a light background, and vice versa. You should be able to identify the subject even at this stage.


The second step is to take the search for readability up a notch. Which compositions tell more about the subject than what it physically is? Which ones convey the subject's origins, emotions, and purpose? In this example, I'm looking for compositions that tell the viewer how the hippo rider operates as a powerful, amphibious soldier.


The third thing I look for is a bit harder to describe, and I believe it is something that comes with a lot of experience in looking, or being a visually oriented person. Sunlight shining through leaves and spiderwebs, the reflected light on the underside of a cloud at sunset, the rough textures of concrete under a streetlamp, a backlit figure on a hillside: some things grab the eye and hold onto it. Just like the sublime feeling that comes with listening to particularly good music while drunk, sometimes perception overrides the stream of consciousness, and allows us to just experience the outside world without the internal monologue. The greatest paintings have a certain charisma that draws attention to them and conveys drama. It could be the violence of the moment, the glory of the light, or the harmony of the tones and colors. Something stands out about these pieces, and it can start as far back as the thumbnail sketch. Certain thumbs will pop out at you, and you won't be able to explain why they are better than the others, other than that they are more evocative.

After narrowing down my choices, I am left with three thumbs, each with different elements that I like. Moving counter-clockwise from top left, I like the first for its drama and the how it seems to convey the power of the hippo, I like the second because the rider is clearly shown, while sending the eye back to the hippo with the line from the bow's arrow to the hippo's face, and the third conveys the purpose of the hippo riders as amphibious cavalry. The fourth, at top right, is a new thumb that I drew based on the other three, that will be the foundation for my rough sketch.


When handling a rough sketch I try to retain the loose sense of experimentation that I talked about in Pt 1 when handling thumbnail sketches. At this stage I have a general idea of the finished piece, but elements can be easily adjusted before they are defined. Now is not the time to add details, it is the time to define the major elements of the piece, to make sure that they work together to define each other.


Try to make sure that overlapping forms are clearly one in front of the other. Putting something in the foreground barely touching something behind it takes away the sense of depth. Also look out for lines that confuse the form rather than defining it. Sometimes lines from one object may look like the continuation of the lines from another, and both objects lose clarity. Hold the image up to a mirror, or if you're working digitally, flip it accordingly, to make sure that everything still looks good. Our brains do strange things, and the mirror quickly points out to us where a shape is wonky or a curve is weird.

In the next installment, I'll talk about arranging tones and moving into the final drawing.

Thursday, May 6, 2010

Process, Pt 1

How to Start a Painting

Welcome to the beginning of a series I am putting together to show my process of creating an image. Hopefully it will be informative and helpful for my fellows in the pursuit of artistic greatness.


Step One: Familiarization

Before you begin any project, you must do the research to know what you're dealing with. First, find out who will be looking at the piece; children, young men, and elderly women all expect to see something different, and have different tastes. Second, find out about your subject. If it is a living thing based in reality, learn about its behavior, its habitat, etc. If it is something unliving, learn about its history and the culture that surrounds it. If your subject is something that doesn't exist, find out about the closest things that do.

For this project, I will be illustrating for a personal project, a card game I am working on. It is similar to Magic: the Gathering, in genre and demographic.

The card I will be illustrating is called Hippo Rider, the concept being some kind of humanoid warrior creature(s) that use hippopotamuses as mounts.

As I am already comfortable drawing the figure, my first step is to learn about the hippo. I go to wikipedia, watch nature documentaries, go to the zoo, whatever I can get my eyes and ears on so I can get a sense of the character of the hippo. By doing this I learn that they are massively powerful, fast sprinting, usually docile but potentially very dangerous and aggressive, communal, amphibious creatures. This is also the best opportunity to gather visual reference of hippos in various poses to use later.

Now, finally, I can start drawing. I begin by learning the structure of the hippo by doing a couple quick skeletal overlay studies:


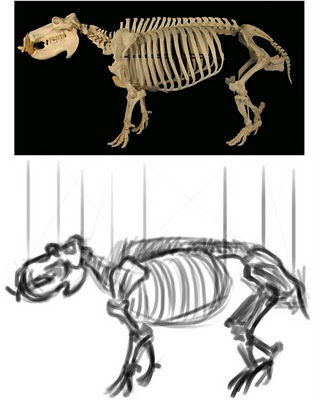
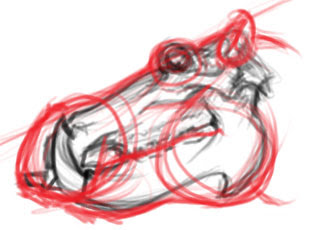
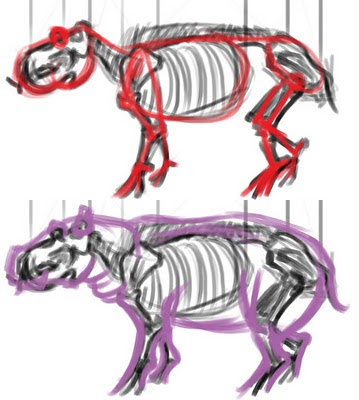
This gives me an understanding of how to arrange the hippo's anatomy, how it moves, and how its massive weight is held off the ground. It also gives me the opportunity to mentally catalog the unique visual characteristics of the hippo so I can draw it quicker and in such a way that it is easily identifiable in the image.

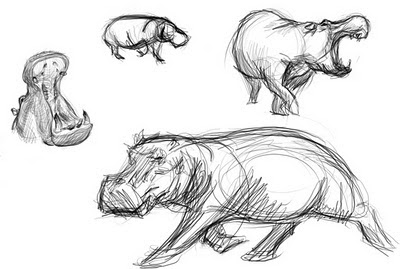
Then, I draw a few quick sketches from the visual reference I have collected, so my hand and eye get a feel for the kinds of curves and shapes that make up the creature. This also serves as a warm up for drawing the thumbnails. Warming up can be very helpful.


Step Two: Thumbnail Sketches

Next, I deal with composition. I work at the proportions of the finished piece, scaled down. I explore the various ways of displaying the hippo rider's form. At this stage, I don't have to put more than a few minutes into each thumb. Many artists put in less time, or do more thumbs, but I find twenty five gives me a lot of options, and allows each thumb to be clearer.


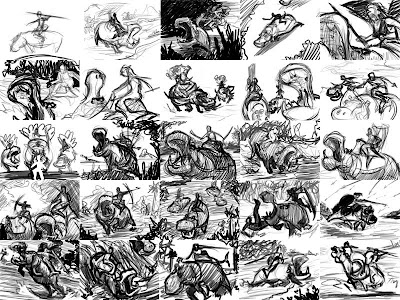
Try to think of each thumb as a visual experiment. Don't let any one thumb become too precious. Just put the idea down and move on. It can be easy to run out of ideas if you let yourself get too rigid. Only adhere to what is absolutely essential to the image, and let everything else change. In this case, so long as I show at least one hippo and someone sitting on it, it passes. Play with the angle that the subject is seen from, the situation the subject is in, etc.

In my next installment, I will talk about picking out the thumbs that work best, and moving into the rough sketch.